Snowflake Sourdough Bread Design
Learn how to create a snowflake sourdough bread design with simple scoring tips, shallow cuts, and a clean expansion score for beautiful winter loaves.
Equipment
- Bread lame or very sharp razor blade
- Flour
- Dental Floss
Instructions
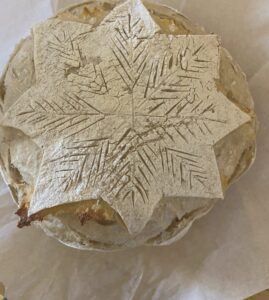
- Dust the Loaf With FlourLightly sprinkle flour over the top of your fully proofed, cold sourdough loaf. Use your hand or a fine-mesh sifter to evenly coat the surface. This creates contrast so the snowflake pattern really stands out after baking.
- Create the Snowflake Template With FlossTake a clean piece of dental floss (or thin kitchen string) and gently press it into the floured surface of the dough to trace your snowflake shape.This guide helps you keep the design centered and symmetrical.First press one vertical line.Then add two diagonal lines to form a six-point snowflake.The floss shouldn’t cut the dough; it just leaves a faint guide you can follow when scoring.
- Make the Main Expansion CutUsing a sharp razor blade, make one continuous, deeper cut along the lower edge of your snowflake template.This is your primary expansion score, which gives the loaf a controlled place to open.Without this cut, the decorative lines may tear or distort.Keep this cut clean and slightly curved if you prefer more movement in the final loaf.
- Score the Main Snowflake ArmsNow, follow the floss lines you pressed earlier:If your blade sticks, wipe it clean between cuts.Use light pressure to create shallow cuts along each of the six arms.Start at the center and pull outward in one smooth motion.These are not meant to open dramatically; they create the crisp snowflake outline.
- Score the Main Snowflake ArmsNow, follow the floss lines you pressed earlier:If your blade sticks, wipe it clean between cuts.Use light pressure to create shallow cuts along each of the six arms.Start at the center and pull outward in one smooth motion.These are not meant to open dramatically; they create the crisp snowflake outline.
- 5. Add Delicate Branches and DetailsTo make the snowflake look intricate and dimensional:This is where the loaf transforms from simple scoring to a beautiful winter design.Add small angled dashes extending off each arm (like little branches).Keep these cuts very light.Add tiny decorative slashes between the arms if you want a more detailed starburst outline.
- Add Delicate Branches and DetailsTo make the snowflake look intricate and dimensional:This is where the loaf transforms from simple scoring to a beautiful winter design.Add small angled dashes extending off each arm (like little branches).Keep these cuts very light.Add tiny decorative slashes between the arms if you want a more detailed starburst effect.e outline.Double check your cuts are clean and even.
- Bake as UsualCarefully lift the loaf into your preheated Dutch oven.Bake covered for the first 20 minutes to encourage oven spring, then uncover to brown and crisp the pattern.When it emerges, the deeper cut will open up naturally, while the snowflake design stays crisp and elegant on the floured surface.