
How To DIY Paper Bag Snowflakes + easy video tutorial
Today I wanted to share a step-by-step tutorial for one of my favorite simple crafts: DIY paper bag snowflakes.
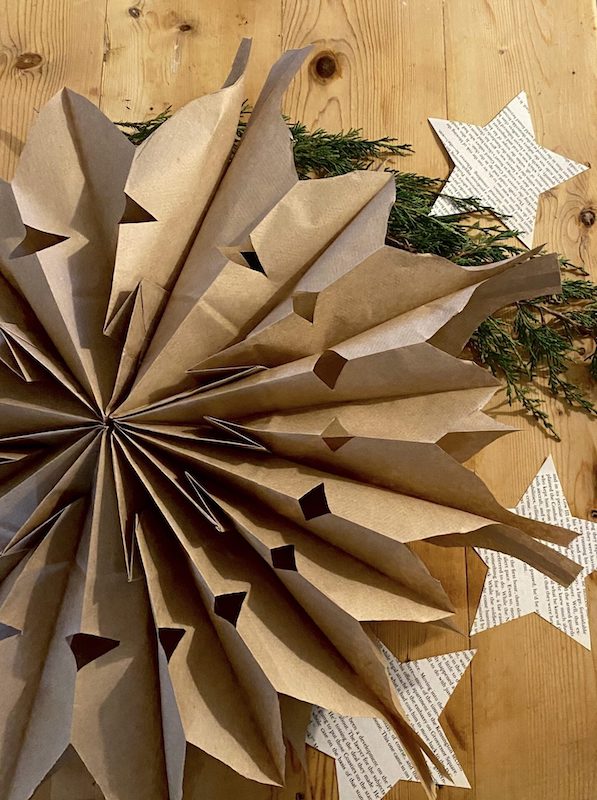
These giant snowflakes are inexpensive, high impact, and truly a great way to make your home feel like a winter wonderland without much added effort.
Paper bag fan crafts like these are so fun, and with just a few supplies, you can create your own giant paper bag snowflakes, smaller versions for the tree, or even a variety of snowflakes in different shapes and designs.
I am really loving this 12 Days of Christmas Homemaking series! It has been so fun to share ideas and creativity to fill your homes this Christmas!
Why You Will Love These Paper Bag Snowflakes
The best part about this project is that it checks all the boxes for an easy craft.
They’re budget-friendly, kid-friendly, and only takes about ten minutes from start to finish. You don’t need specialty supplies. Just some paper bags, glue, and scissors.
There are so many fun ways to customize your snowflake design too. You can use white paper lunch bags for crisp white paper bag snowflakes, or go with rustic brown paper bags for a cozier feel.
Try cutting different patterns, small shapes, or even mixing bag colors for a variety of snowflakes. Whether you make them giant for the wall or smaller paper bags for ornaments, they always feel like a fun craft to do with kids or friends during the holiday season.
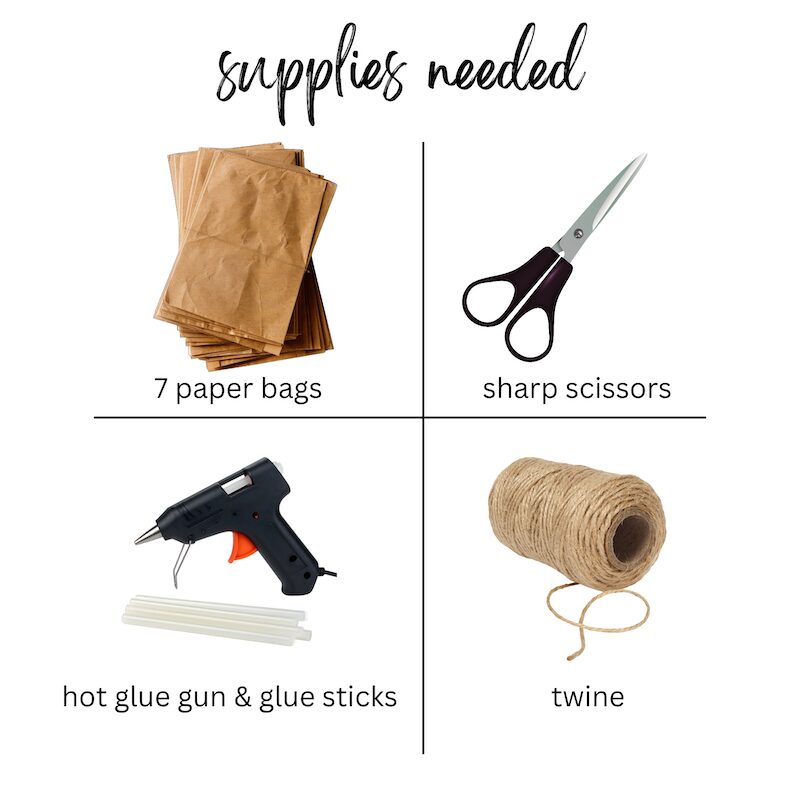
Supplies You Will Need:
Here’s the full supply list you’ll want before you begin:
- Seven paper bags or white paper lunch bags (7 makes one snowflake)
- Hot glue gun and glue stick (you can also use pieces of tape if preferred)
- Strong Scissors or the sharpest scissors you own
- Piece of Twine or wire to hang
- Optional: hole punch for threading ribbon through the top of the bag
- Optional extras: fairy lights or command hook
This is truly an inexpensive way to add cozy charm to your home. You probably already have everything on hand in your kitchen, from last Christmas, or even tucked away in your craft bin.
If you tried my DIY Paper Star Garland last year, this project will feel like a natural next step.
Hey friends, please don’t forget to follow me over on Instagram!  I post more photos and ideas over there.
Sharing this post on Facebook or Pinterest is another great way you can help me out at no cost to you. Thank you!
How to Make DIY Paper Bag Snowflakes
Step 1: Prep the Bags
Plug in your hot glue gun so it’s ready. Grab your entire stack of seven paper bags and make sure the bottom fold of each bag is facing the same direction.
Place the first bag flat with the folded bottom area at the bottom of the bag and the open end of the bag at the top.
Step 2: Glue the Bags Together
Draw a thin line of glue in a straight line down the center of the bag, plus a horizontal glue line across the top of the first bag, forming a “T” shape.
Press the second bag directly on top, lining up the top edges and the sides of the bags so they don’t go the wrong way. Repeat with the next bag until all seven are glued into one neat entire stack.
If you’re making giant snowflakes, be sure your glue lines are strong enough to hold the weight. If you want to reuse them next year, consider using pieces of tape for the final closure.
Step 3: Cut Your Snowflake Pattern
Here comes the fun part! With your sharpest scissors, cut the top of the bag into a point or curve. Add cut lines along the sides of the paper bags or the top edges to create a symmetrical design.
Think about different ways to trim: a rounded top bag, triangular cut lines, or unique pattern ideas. This is where you can play with different designs and come up with smaller shapes, like triangles, diamonds, or half-circles.
Step 4: Open the Snowflake
Once cut, gently pull apart the layers of the bags. As you bring the sides of the paper bags together, the bags will unfold into a full circle. Attach the opening of the bag ends with glue or tape.
Add a piece of twine through a hole punch at the center of the bag, or glue it to the front of the bag, and your snowflake is ready to hang.
Display Ideas for Paper Snowflakes
Now that you’ve finished your easy paper bag snowflakes, here are some fun ways to display them:
- Hang them from a command hook on the wall or ceiling.
- Add them to your Christmas decor with fairy lights for extra sparkle.
- Create a cluster of giant paper bag snowflakes over your dining table for a dramatic, high-impact look.
- Make smaller versions with smaller paper bags to use as ornaments or to decorate gifts.
- Mix brown paper bag snowflakes and white snowflake designs for contrast.
Whether you display them just for the holiday season or keep them up into January for a cozy winter wonderland feel, they’re always beautiful.

Tips and Tricks
- If your glue lines aren’t holding, go back with your hot glue gun and reinforce the center glue line and side of the paper bags.
- Make sure all bags are facing the same direction. The wrong way will cause the design not to open correctly.
- For an easy DIY Christmas craft with kids, use tape instead of hot glue and smaller paper bags for safety.
- Store your snowflakes flat at the end of the season so you can pull them out next year.
Enjoy Making These Paper Bag Snowflakes
These DIY paper bag snowflakes are such a simple craft with huge impact. They’re one of my favorite low effort DIYs, and I love how they bring warmth and beauty to the home. If you’re looking for fun crafts to try this holiday season, this is a great way to add charm without spending much time or money.
I hope this resource blesses you and your family this year!
How To DIY Paper Bag Snowflakes
Equipment
- Seven paper bags or white paper lunch bags (7 makes one snowflake)
- Hot glue gun and glue stick (you can also use pieces of tape if preferred)
- Strong Scissors or the sharpest scissors you own
- Piece of Twine or wire to hang
- Hole punch for threading ribbon through the top of the bag optional
- Fairy lights or command hook optional
Instructions
Step 1: Prep the Bags
- Plug in your hot glue gun so it’s ready. Grab your entire stack of seven paper bags and make sure the bottom fold of each bag is facing the same direction. Place the first bag flat with the folded bottom area at the bottom of the bag and the open end of the bag at the top.
Step 2: Glue the Bags Together
- Draw a thin line of glue in a straight line down the center of the bag, plus a horizontal glue line across the top of the first bag, forming a “T” shape. Press the second bag directly on top, lining up the top edges and the sides of the bags so they don’t go the wrong way. Repeat with the next bag until all seven are glued into one neat entire stack.If you’re making giant snowflakes, be sure your glue lines are strong enough to hold the weight. If you want to reuse them next year, consider using pieces of tape for the final closure.
Step 3: Cut Your Snowflake Pattern
- With your sharpest scissors, cut the top of the bag into a point or curve. Add cut lines along the sides of the paper bags or the top edges to create a symmetrical design. Think about different ways to trim: a rounded top bag, triangular cut lines, or unique pattern ideas. This is where you can play with different designs and come up with smaller shapes, like triangles, diamonds, or half-circles.
Step 4: Open the Snowflake
- Once cut, gently pull apart the layers of the bags. As you bring the sides of the paper bags together, the bags will unfold into a full circle. Attach the opening of the bag ends with glue or tape.Add a piece of twine through a hole punch at the center of the bag, or glue it to the front of the bag, and your snowflake is ready to hang.
