
How to Make No-Sew Quilted Christmas Ornaments
I love a good Christmas DIY, and this is a good one! This no-sew quilted Christmas ornaments craft is so pretty and looks like it has been quilted. It is a perfect craft to make while sitting and watching Christmas movies. And it would also make a great gift!
I have broken this tutorial down into steps to make sure everything is simple and clear. This is not a hard craft to do, but I want to make sure the steps are clear. Once you get one side done, the other side will be a breeze! You will be making tons of no-sew ornaments in no time.
Supplies Need for Making a No-Sew Christmas Ornament
3 different fabrics – I like to use high contrast fabrics for this craft so you can really distinguish the layers really well.
Scissors – You can also use a rotary cutter and mat.
Thin Ribbon – used for hanging the ornament on the tree.

This post contains affiliate links, which means I make a small commission at no extra cost to you. Please read our disclosure policy.
Step 1
Cutting
Cut all your squares out. You will need to cut your fabric into 2 inch squares. Remember that these squares will be used for both sides of the ornament.
Center – Fabric 1 : 8 squares
Middle Layer – Fabric 2 : 16 squares
Third Layer – Fabric 3 : 16 squares

Step 2
Ironing
We are going to turn our squares into triangles!
I like to take this extra step before I get started and go ahead and iron all my squares. This part is a little time consuming, so I like to get it all done at once so I can finish up the ornament cuddled up on the couch watching a Christmas movie.
- You will take a 2 inch square and fold it in half and iron it.

- Next, you will fold in each side of the point and iron, as shown in the photo. This will look like a paper airplane point!


- Repeat this for all of the squares.

Now that you have turned your squares into triangles, I like to separate them into the amounts I need per side. You will need : 4 triangles of fabric one, 8 triangles of fabric two, and 8 trianglesof fabric three. 20 triangles per side of ornament.
Hey friends, please don’t forget to follow me over on Instagram!  I post more photos and ideas over there.
Sharing this post on Facebook or Pinterest is another great way you can help me out at no cost to you. Thank you!
Step 3
Drawing Quadrants
This is a very simple step that will make the next step simpler.
- You will put a rubberband (or hairband! I had one handy) around the styrofoam ball to divide it in half. Trace this line.
- Move the rubberband so you can trace an intersection in the middle of both side of the styrofoam, as pictured. This will help you a lot as you do your first 4 triangles and getting them lined up.


Step 4
Pinning
LAYER ONE: You will need 4 triangles of fabric one. Next, you will line the point up with a quadrant line. IMPORTANT: as you pin, offset the pins from the center of the triangle so that your pin will be hidden. I put my pin slightly to the right, as shown. Do this anytime you add a new triangle so that the pins will not be shown.

You will fold the ironed flaps down and pin them around the top, as shown below. Then you will get all 4 triangles from fabric one and pin them in place around the quadrants. Your first layer is complete!

LAYER TWO: Now you will start with fabric two. Take a triangle, and you want to place it right on top of a fabric one triangle, center seam lined up, but half an inch back. You don’t have to measure this exactly but it can help to at least visualize the distance this first time. Next, you will pin exactly as you did with fabric one, all the way around, as shown in photo below with 4 triangles.
Crafting Tip: Try and line up the seas to make this look very clean. Lining up for triangles will help to hide the styrofoam ball.


Now you will take the next 4 triangles of fabric two, and you will start pinning them in the 4 open areas (the diagonals) to create your center star! The photos below show this step.


LAYER THREE: Now you will repeat the same steps with fabric 3. Add the first 4 triangles half an inch back, and then add the last 4 on top of those in the diagonles.


Repeat this process for the other side of the styrofoam ball as well.
Step 5
Finishing Your No-Sew Ornament
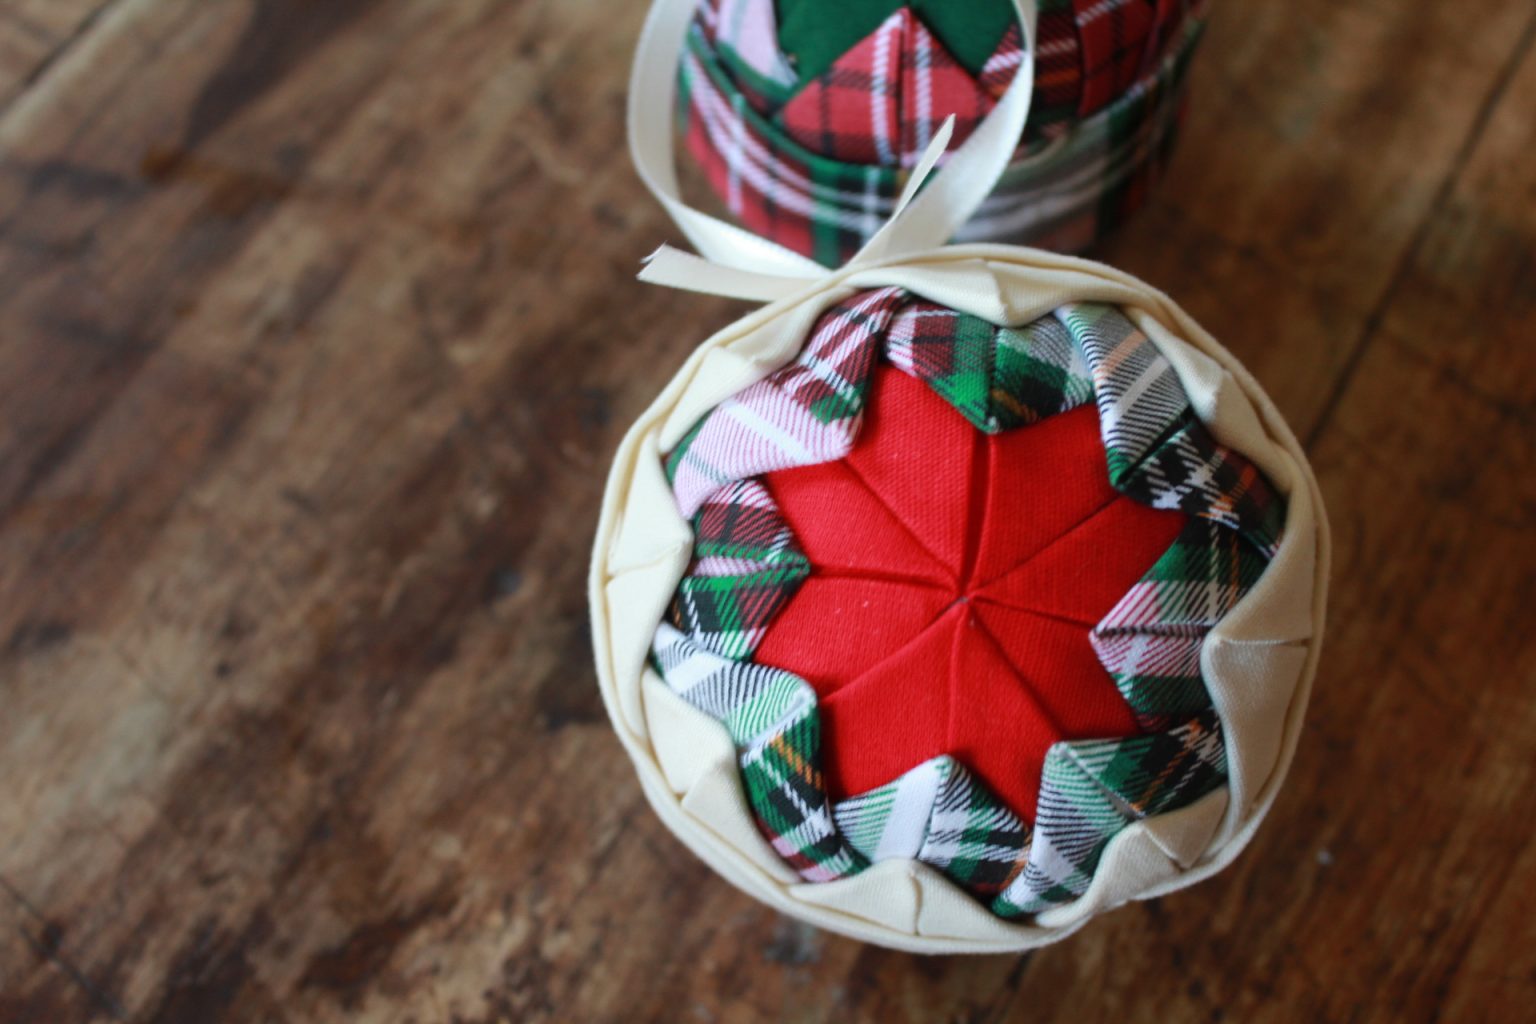
Now that you have both side of your no-sew Christmas ornament pinned, you will add the final touches. You can either use a piece of fabric , as when below or you can also use ribbon for this.
If you use fabric, cut it into a 12 x 2.5 inch rectangle. Fold it in half lengthwise and then fold the sides in, as shown below.

Now you will use this folded rectangle (or ribbon) to cover up the messy edges and pins. I like to iron in the end for a clean finish.


Finally, plug in your hot glue gun, and you will add a ribbon to the top center of your ornament so you can hang it on your tree!

I hope this tutorial of making a no-sew Christmas ornament was helpful to you as you prepare your homes this Christmas season!

How to Make No-Sew Quilted Christmas Ornaments
Equipment
- 3 different fabrics – I like to use high contrast fabrics for this craft so you can really distinguish the layers really well.
- Scissors – You can also use a rotary cutter and mat.
- Iron
- Dressmaker Pins
- 3 inch styrofoam ball
- Hot Glue Gun and Glue
- Thin Ribbon – used for hanging the ornament on the tree.
Instructions
Step 1: Cutting
- Cut all your squares out. You will need to cut your fabric into 2 inch squares. Remember that these squares will be used for both sides of the ornament.Center – Fabric 1 : 8 squaresMiddle Layer – Fabric 2 : 16 squaresThird Layer – Fabric 3 : 16 squares
Step 2: Ironing
- We are going to turn our squares into triangles!I like to take this extra step before I get started and go ahead and iron all my squares. This part is a little time consuming, so I like to get it all done at once so I can finish up the ornament cuddled up on the couch watching a Christmas movie.You will take a 2 inch square and fold it in half and iron it.Next, you will fold in each side of the point and iron, as shown in the photo. This will look like a paper airplane point!Repeat this for all of the squares.Now that you have turned your squares into triangles, I like to separate them into the amounts I need per side. You will need : 4 triangles of fabric one, 8 triangles of fabric two, and 8 trianglesof fabric three. 20 triangles per side of ornament.
Step 3: Drawing Quadrants
- This is a very simple step that will make the next step simpler. You will put a rubberband (or hairband! I had one handy) around the styrofoam ball to divide it in half. Trace this line.Move the rubberband so you can trace an intersection in the middle of both side of the styrofoam, as pictured. This will help you a lot as you do your first 4 triangles and getting them lined up.
Step 4: Pinning
- LAYER ONE: You will need 4 triangles of fabric one. Next, you will line the point up with a quadrant line. IMPORTANT: as you pin, offset the pins from the center of the triangle so that your pin will be hidden. I put my pin slightly to the right, as shown. Do this anytime you add a new triangle so that the pins will not be shown.You will fold the ironed flaps down and pin them around the top, as shown below. Then you will get all 4 triangles from fabric one and pin them in place around the quadrants. Your first layer is complete!
- LAYER TWO: Now you will start with fabric two. Take a triangle, and you want to place it right on top of a fabric one triangle, center seam lined up, but half an inch back. You don't have to measure this exactly but it can help to at least visualize the distance this first time. Next, you will pin exactly as you did with fabric one, all the way around, as shown in photo below with 4 triangles.Now you will take the next 4 triangles of fabric two, and you will start pinning them in the 4 open areas (the diagonals) to create your center star! The photos below show this step.
- LAYER THREE: Now you will repeat the same steps with fabric 3. Add the first 4 triangles half an inch back, and then add the last 4 on top of those in the diagonles.Repeat this process for the other side of the styrofoam ball as well.
Step 5: Finishing Your No-Sew Ornament
- Now that you have both side of your no-sew Christmas ornament pinned, you will add the final touches. You can either use a piece of fabric , as when below or you can also use ribbon for this.If you use fabric, cut it into a 12 x 2.5 inch rectangle. Fold it in half lengthwise and then fold the sides in, as shown below.Now you will use this folded rectangle (or ribbon) to cover up the messy edges and pins. I like to iron in the end for a clean finish.
- Finally, plug in your hot glue gun, and you will add a ribbon to the top center of your ornament so you can hang it on your tree!
Pin it for Later..

More Posts To Enjoy:
25 Handmade Christmas Gift Ideas