
How Long to Proof Sourdough (Complete Guide)
Knowing how long to proof sourdough before baking to achieve the best sourdough bread results is important.
Proofing time matters for homemade sourdough bread because if you over-proof your dough, it can have the wrong crumb and weak structure, and will not bake properly. If you under-proof your dough, it can result in dense bread with a poor rise.
We will be covering proofing times, signs that your dough is ready, room vs fridge proofing, and proofing tips, along with troubleshooting and FAQs. I hope this helps you figure out proofing your sourdough even just a little bit!
How Long Should You Proof Sourdough?
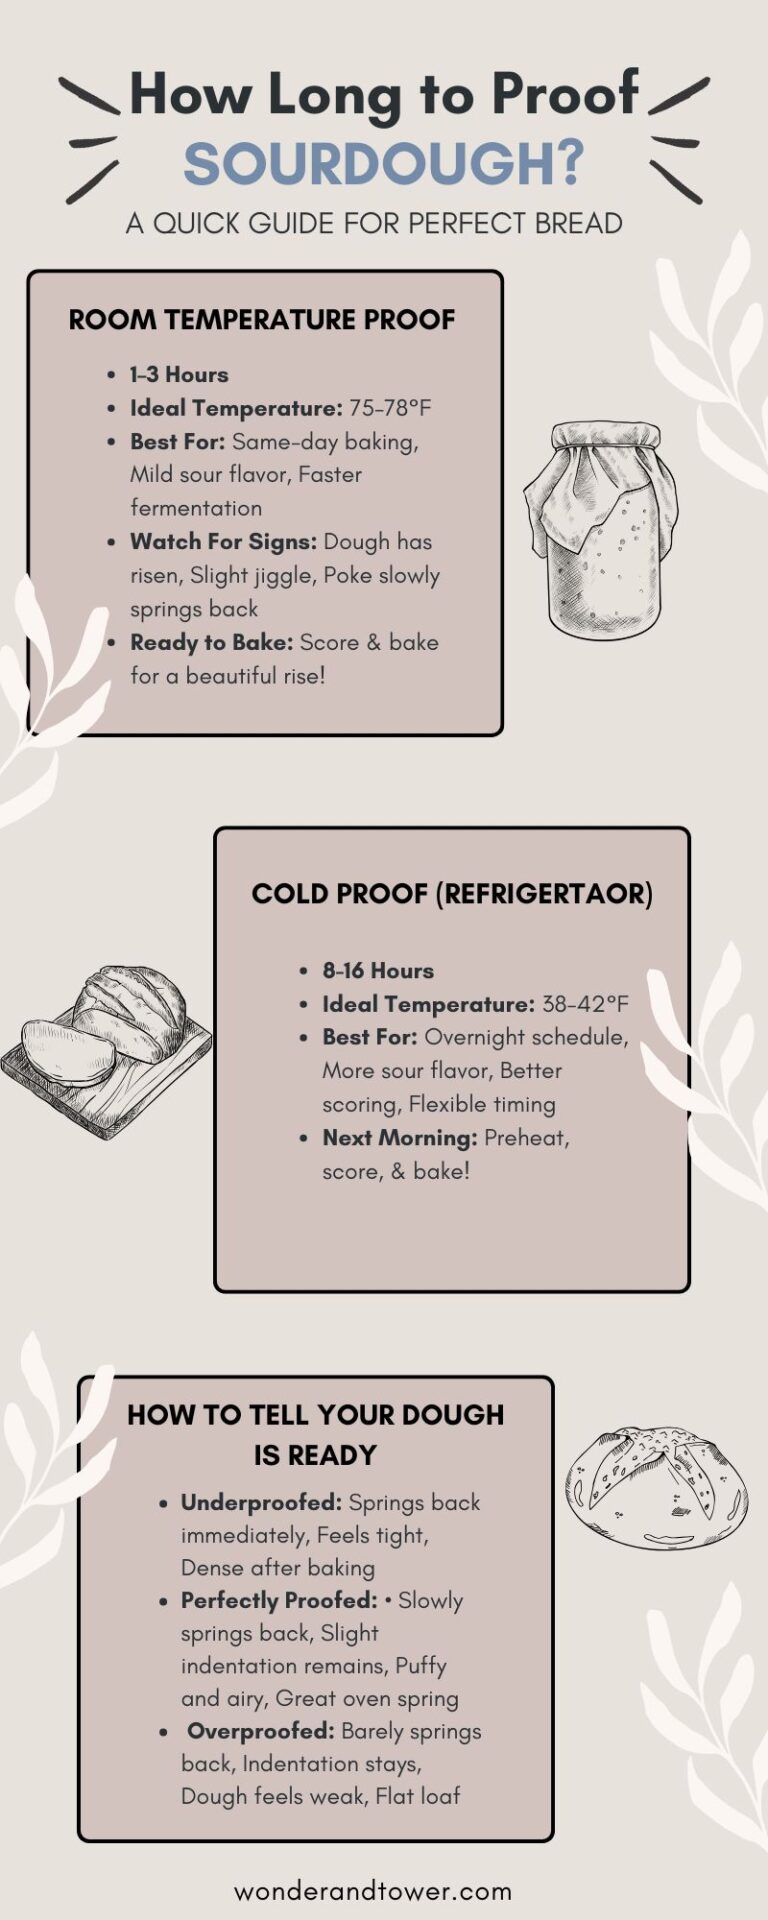
Proofing Method Average Time Best For
Room Temperature 1–3 hours Same-day baking
Refrigerator (Cold Proof) 8–16 hours Better flavor & flexibility
Extended Cold Proof 24–48 hours More sour flavor

The average sourdough proofing time is 1–3 hours at room temperature or 8–16 hours in the refrigerator. The exact timing depends on your kitchen temperature, the strength of your starter, and how active your dough is after bulk fermentation.
Every sourdough recipe is a little different, so proofing times should always be used as a guide rather than an exact rule. This complete guide will help you understand proofing sourdough!
Shop Sourdough Supplies

What Is Proofing in Sourdough Bread Baking?
Proofing your sourdough bread is the dough’s second (and final rise), and occurs after the final shaping of your dough. This can be at room temperature or in the refrigerator.
This is different than the bulk fermentation (the first rise) because the dough is already divided and shaped into its final shape during this proofing stage.
Fermentation in sourdough is the process where natural yeast and lactic acid bacteria break down the sugars in the flour. This is the process that gives sourdough its rise, texture, and signature, complex flavors. This happens during the bulk fermentation and proofing stage.
Warmer temperatures will make this process go faster, and lower temperatures will slow the process down.
Try more Sourdough Recipes, like these Homemade Sourdough Discard Bagels
What Affects How Long Sourdough Takes to Proof?
While most sourdough loaves proof for 1–3 hours at room temperature or 8–16 hours in the refrigerator, several factors can speed up or slow down the process. Instead of relying only on the timer, consider these variables before baking.
Kitchen Temperature
Kitchen temperature has the biggest impact on proofing time. Warm kitchens speed up fermentation, while cooler kitchens slow it down.
- 65°F: Slower proof
- 70-75°F: Average proof
- 75–78°F: Ideal proofing temperature
- 80°F+: Watch carefully to avoid overproofing
Starter Strength
A strong, active sourdough starter will proof dough much faster than a weak starter. Your starter should be bubbly, doubled in size, and recently fed before mixing your dough.
Dough Hydration
Higher hydration doughs generally ferment faster because the yeast moves more easily through wetter dough. Lower hydration doughs often need a little more time.
Flour Type
Whole wheat and rye flours usually ferment faster than white bread flour because they contain more nutrients for the wild yeast.
Humidity
Humidity has less effect than temperature, but dry air can dry out the surface of your dough. Always keep your dough covered while proofing.
Dough Size
Larger loaves typically need a little longer to proof than smaller loaves.
Tip: These are general guidelines. The best way to know your dough is ready is to watch the dough, not the clock.

Try this delicious Simple Sourdough Bread Recipe
How Long to Proof Sourdough at Room Temperature
The average range for proofing your sourdough at room temperature can be anywhere from 1-3 hours.
A room temperature proof on the counter will make the fermentation process go faster because the yeast will grow faster at warmer temps. This will obviously depend on the temperature of your kitchen, but a good time frame is 1-3 hours.
There are factors that will affect timing, such as temperature, dough hydration, starter strength, and even the recipe that you use.
The main factor will be temperature, though. If you proof you dough at room, warm temperature, it will be a shorter amount of time because the yeast will grow faster.
If you proof in your refrigerator at colder temperatures, it will take longer, usually overnight, to proof your sourdough.

Cold Proofing: How Long to Proof Sourdough in the Fridge
Cold proofing, also can be called cold fermentation, times can vary. The typical timeframe for overnight proofing your sourdough in the refrigerator is 12- 24 hours. You can proof for longer, up to 48 hours, but the dough’s texture could change a bit. It will still taste great!
The major benefit to cold proofing your dough is the flexibility it provides. When you cold proof in cooler temperatures, you slow down the fermentation process, and you can leave it in the fridge for longer than you would be able to at room temperature.
The optimal time frame for cold proofing in the refrigerator is anywhere from 8 to 16 hours. Overnight works great for this, too.
Proofing Tip: For successful proofing, always cover your dough. You can cover with a dish towel, but beware that you will lose moisture and run the risk of your dough being dried out a bit. The best option is with plastic wrap on top or a plastic bag wrapped around your banneton to hold in moisture.

Signs Your Sourdough Is Fully Proofed
There are a few visual clues to look for to tell if your sourdough is done proofing. There will be a slight jiggle to the dough, and it will be risen the proper amount according to your recipe.
You can also do the poke test. This is where you poke your dough. Your finger should come off clean, and the dough will partially bounce back from the poke. This let’s you know your dough is ready to be baked.
Common signs of under-proofed dough will be dough that does not bounce back when poked. Under-proofed sourdough bread will not have a good oven spring after baking, adn result in flat bread. It will also not have a very strong sour flavor because it did not have enough time for the acids to develop during fermentation.
Learn how to How to Reheat Sourdough Bread So It Tastes Fresh
Understand the Sourdough Poke Test
The poke test is one of the easiest ways to know if your dough is ready to bake.
Underproofed
- springs back immediately
- feels tight
- needs more time
Properly Proofed
- slowly springs backs
- light indentation remains
- dough feels airy
Overproofed
- barely springs back
- indentation stays
- dough feels fragile
Best Sourdough Proofing Tips for Beginners
Best Sourdough Proofing Tips

- Cover your dough.
- Watch your dough, not the clock.
- Adjust for seasonal temperatures.
- Cold proof for better flavor.
- Don't panic if you overproof once.
If you think you’re dough is over-proofed, I recommend writing down what you did during this process and learning from your mistakes. The process of baking sourdough is all about learning as you go, and correcting the mistakes the next time! Over-proofed bread is still bread, and you can still eat and enjoy it.
If you think your dough is under-proofed before baking, let the dough rest a bit longer. If it’s already shaped, give it more final proof time at room temperature.
There will be times when you need to adjust proofing times based on seasons or environment. for instance, if your home is warmer in the summer, you will want to make your room temperature proofing times shorter.
Choose room temp proofing when you’re shorter on time, and go with the fridge for proofing for better flavor and flexibility in your baking schedule.
Fridge (cold) proofing, on the other hand, slows down fermentation process, and dough temperature, therefore giving the dough more time to develop a tangier flavor and a chewier texture.
Room temperature proofing is best when you want a faster rise and a milder flavor. It is perfect if you’re baking the same day.

Common Sourdough Proofing Mistakes

Watching the clock instead of the dough - Proofing times are only estimates.

Letting dough dry out - Always cover the dough.

Proofing in a kitchen that's too warm - Temperatures above 80°F can cause overproofing very quickly.

Using a weak starter - An inactive starter makes timing unpredictable.
Create your own Active Sourdough Starter using my simple starter recipe.
Best Containers for Proofing Sourdough Bread
When choosing what to proof your sourdough in, you will want to consider what type of bread you will make.
If you are making a simple sourdough boule, you will want to proof your sourdough in a banneton. This will cause you to have round shaped dough, which works perfect when you plan on baking in a Dutch oven.
If you are making a sourdough sandwich loaf, you can proof your bread in a bread pan. The best way to shape your dough is into a traditional bread loaf shape, and place in the loaf pan.
Both shapes work best when you put a plastic bag around container while in the fridge or left on the counter to hold in moisture.

The Best Way to Proof Sourdough at Room Temperature
There are a few tips if you plan on proofing your sourdough at room temperature.
- Make sure you set a timer. Depending on how warm your room is, your dough can overproof quickly if you’re not keeping an eye on it.
- Put a dish towel or cling wrap on your banneton or bread pan to hold moisture in and keep dust out.
Learn how to make the most beautiful bread: Sourdough Score Design
Timeline for Baking Sourdough with a Room Temperature Proof
8:00 AM – Mix your dough and let it sit for 30 minutes to autolyze.
8:30 AM – Add water and salt.
9:00 AM – First stretch and fold.
9:30 AM – Second stretch and fold.
10:00 AM – Third stretch and fold.
10:30 AM – Fourth stretch and fold.
11:00 AM – 5:00 PM – Bulk fermentation time until dough has doubled.
5:00 PM – Shape dough and place on counter. Set timer for 1 hour to see how fast your dough is rising.
6:00 PM-8:00 PM – During this time frame, you will watch your dough and use the signs mentioned above to see when your dough is ready to bake.
8:00 PM – Preheat oven. Score your bread. Bake for a total of 35-40 minutes.
8:45 AM – 9:45 PM- Cool bread before cutting and eating.

The Best Way to Overnight Proof in the Refrigerator
There are a few tips if you plan on proofing overnight in your refrigerator, specifically in a banneton.
- Flour your banneton and bread dough liberally to make sure your dough does not stick.
- Sometimes, flour alone doesn’t keep it from sticking. You can also place a tea towel into the banneton and flour it to help keep dough from sticking.
- Place a plastic bag around the banneton to hold moisture in.
- When you plan on baking, place a piece of parchment paper on top of your dough, and the flip the banneton upside down so the dough comes out into the parchment paper on the counter.
Timeline for Baking Sourdough with an Overnight Proof
8:00 AM – Mix your dough and let it sit for 30 minutes to autolyze.
8:30 AM – Add water and salt.
9:00 AM – First stretch and fold.
9:30 AM – Second stretch and fold.
10:00 AM – Third stretch and fold.
10:30 AM – Fourth stretch and fold.
11:00 AM – 5:00 PM – Bulk fermentation time until dough has doubled.
5:00 PM – Shape dough and place in the refrigerator for overnight ferment.
The next day:
8:00 AM – Preheat oven, pull dough out to score. Bake for a total of 35-40 minutes.
8:45 AM – 9:45 PM- Cool bread before cutting and eating.

Troubleshooting Ideas
| Problem | Cause | Solution |
|---|---|---|
| Dense Loaf | Underproofed | Let dough proof longer |
| Flat Loaf | Overproofed | Shorten proof next time |
| Sticky Dough | Overproofed or high hydration | Reduce proofing time |
| Weak Oven Spring | Underproof | Wait until poke test passes |
| Large Holes Near Top | Underproof | Extend Proofing |
FAQs: Sourdough Bread Proofing
Does sourdough take longer to proof than commercial yeast dough?
Yes, it does. Sourdough takes longer for your dough rise than commercial yeast because it relies on the natural fermentation process using wild yeast and lactic acid bacteria. This is a slower process and less concentrated than the isolated, fast-acting strains found in commercial yeast.
Can you bulk ferment and final proof in the fridge?
Yes, you can. But overall the process will take longer.
What happens if you proof too long?
This will cause overproofed dough. The structure of your dough will be weakened. This may cause your bread to spread and not rise properly.
Can you proof sourdough overnight?
Yes. An overnight proof in the refrigerator is one of the most popular methods because it develops more flavor and gives you a flexible baking schedule.
Can you bake sourdough straight from the fridge?
Yes, many bakers bake directly from the refrigerator because the cold dough is easier to score and helps create better oven spring.
Should sourdough double in size during the final proof?
No. Most sourdough only increases by about 30–50% during the final proof. The bulk fermentation is when the majority of the rise occurs.
How do I know when my sourdough is fully proofed?
Look for a slightly puffy dough that gently jiggles when moved. The poke test should leave a small indentation that slowly springs back.
Can I proof sourdough for 24 hours?
Yes you can. Many recipes work well with a 24-hour cold proof in the refrigerator. Longer proofing can create a tangier flavor, but going too long may weaken the dough.
Why is my sourdough taking so long to proof?
Cool kitchen temperatures, a weak starter, low-hydration dough, or inactive fermentation can all slow proofing. Watch the dough for signs of readiness instead of relying only on the clock.
Can you overproof sourdough in the refrigerator?
Yes you can. Although refrigeration slows fermentation, the dough continues to rise. Leaving it in the fridge too long can eventually lead to overproofing and a weaker loaf.

Final Thoughts on Sourdough Proofing
Best proofing practices include:
- Choosing whether you will room temp proof or cold proof. This will depend on your recipe and time frame.
- Always cover your dough as is proof to avoid moisture loss and to keep any dust or bugs getting into it.
Learning how long to proof sourdough takes practice, but it gets easier with every loaf. While timing charts are a great starting point, the best sourdough bakers learn to read their dough instead of relying only on the clock. As you bake more often, you’ll recognize the signs of a perfectly proofed loaf and enjoy better oven spring, flavor, and texture every time.
When baking sourdough bread, it is important to experiment and observe what happens when you proof your dough at different times. The more baking you do, the more you will be able to understand the perfect proofing time frame to achieve your desired “perfect sourdough loaf”. I hope this helps you on your sourdough journey!
This post contains affiliate links, which means I make a small commission at no extra cost to you. Please read our disclosure policy.
pin it for later…

More Posts To Enjoy:
- How Long to Proof Sourdough (Complete Guide)
- The Wonder & Tower Homemaker’s Library: 30+ Free Printables
- 20 Easy Ideas to Save You Money on a Tight Budget
- 20 Creative Journaling Ideas (Bible Journaling for Women)
- 55 Bible Journaling Prompts for Christian Women